Mobile App Quick Start Guide - Canadian End User
Welcome to Scheduling! There is a lot to learn, we know! This guide is meant to help you wade through the waters of the scheduling Mobile App, with only the options you need to know.

First you will want to download the scheduling mobile app on your device.
To download the mobile app, go into the App Store on your mobile device and search for "CrewSense". The below image is how it will appear in the app store. Once you have found the CrewSense app, select the Get button and from there the app will download onto your device.
Now that the app is downloaded onto your device, you will want to access it in your downloaded apps or by clicking onto the Open button within the app store. As a Canadian user, you will want to select the Canadian log in option. Here is what that will look like:
From there you will need to sign in with your login credentials. If you are an agency who uses TargetSolutions, you will want to click the blue Login with TargetSolutions Tab. Here is what that will look like:
Now that you have logged in, we can get familiar with the different modules and how they can function for you on your device.
When you login you will be taken to the Dashboard module and into your personal Agenda by default. There you will be able to see what your schedule looks like for the next few days. The Agenda will include what assignments you are scheduled on, your work types, and your work hours. You will also be able to click on the Announcements tab to see any information your agency may have posted. In the upper right corner is a bell icon. This is where your notification growls will populate. If you have any notifications waiting for you, a yellow dot will appear within the bell icon. By clicking on the icon you will be taken to your notifications.
By selecting the three horizontal lines in the upper left hand corner, you will gain access to the Modules list within the app (see below image).
Let's go down the line through each module that you will utilize as an End User.
We have previously covered the first module, which is the Dashboard. Again, the Dashboard will be the default view when you access the app.
The Notify Module
Within this module you will have access to the My Notifications and the notifications History.
Any notifications you receive will be posted within the My Notifications tab. To the right of your received notification will be a circle. By clicking on the circle you can choose to acknowledge, mark yourself as responding, or mark yourself as unavailable (see below image). if you mark yourself as responding, you can then go into the History tab and create your response by clicking into the corresponding notification. You can review your notification History by setting specific date periods as well.
The CrewScheduler Module
Within the CrewScheduler you can easily view your agency's assignments and who is scheduled within each assignment for any given date.
When you click into the CrewScheduler, it will default to the assignments for the current date. if your agency has shift or platoon colors set up, you will see that populate across the top of the screen. Within each assignment you can see who is scheduled where, the assignment hours, and staffing levels. By clicking onto an employee, you may be able to view their shift details depending on your permissions, which are set by Admin. You can navigate to different dates on the CrewScheduler by clicking on the backward or forward arrows at the top of the screen.
The Time Off Module
Within the Time Off module you can request time off, see the status of any upcoming time off(s) you've requested and view your time off History.
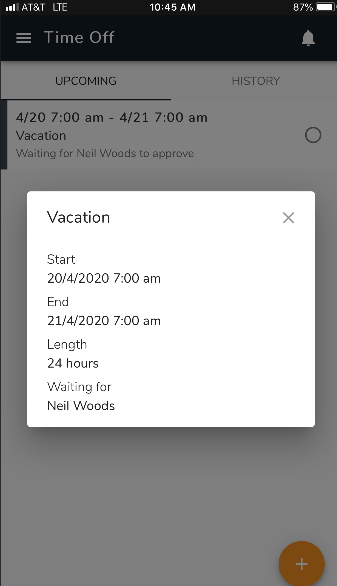
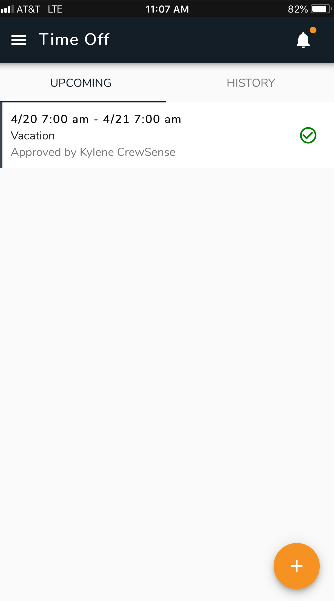
By selecting the Upcoming tab you can click on the yellow + (addition/plus) sign in the lower right corner of the screen and request time off. Once the request is submitted, you can view its status in the Upcoming tab. A gray circle will populate to the right of the pending request. If you click into the circle, you will see the details of your request ( see image A). Once the request has been approved, you will see a green check mark appear within the circle (see image B). Additionally, you will receive a growl notification appear in the form of a yellow dot within the bell at the upper right corner of the screen. If your request is denied by Admin, the request will be removed from within the Upcoming tab and again you will receive a growl notification appear in the form of a yellow dot within the bell.
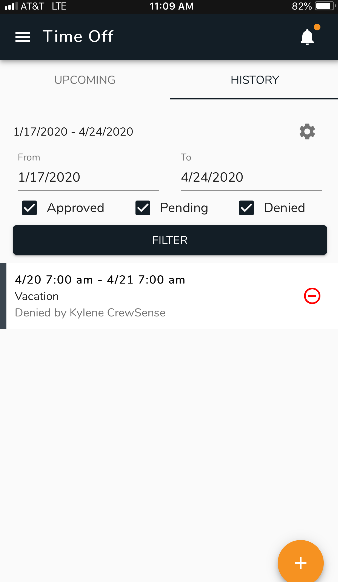
You will then be able to find the details about that denied request in the History tab (see image C). You can review your time off History by setting specific date periods as well as customizing what you would like to see; approved, pending, or denied time offs.
A. B.
B.  C.
C. 
The CallBack Module
Within the CallBack module you can view Current CallBacks you are eligible for, respond by accepting or denying a CallBack, and view CallBack History.
When a CallBack has been sent out to a list of employees and you're on the list you will be contacted/notified via the methods you have selected in your Contact Info settings (on your desk top profile) and your Notification preferences (within the mobile app).

To review/edit your Notification preferences
in the app, go into the Profile module and scroll down to Notification preferences. Here you can select how you would like to be notified about CallBack opportunities.
For example, if you choose to be contacted in your desktop profile via a text message you will receive contact that way. Additionally, if you choose to be notified via mobile app in your Notification preferences, you will receive an alert within the app as well as the ability to accept the CallBack in the Dashboard module and within the CallBack module.
You can review your CallBack History by setting specific date periods as well as customizing what you would like to see; i.e. CallBack Status' and Lists.
Profile
Within your Profile tab you can edit your personal info, set your Notification preferences as well as a Do Not Disturb period.
Settings
Within your Settings tab you can set your Date format, Time format and select your Time zone.
Feedback
At the bottom of your modules menu there is a blue Feedback option. If you have any Feedback or suggestions as you get familiar with the functionality of the app, please send it to us! We look forward to hearing from you!
Related Articles
Advanced Start Up Guide
Once you have used the Quick Start guide, you'll be able to get your system up and running. This guide is to help you use the more advanced features of the system, ones that can enhance the usage of the program but are not required for day to day ...Quick Start Guide
The scheduling platform can be fully configured in a single afternoon. Using this guide, we will go step by step through the process of creating your unique schedule to have a fully functioning system within a few hours. 1. Upload your employees You ...User Permissions Key
The Scheduling platform has a built-in user permissions module that allows you to set user permissions on a per-employee basis. In this article, we have put together a 'Key' for you to refer to when deciding which permissions you'd like to enable for ...End Users
Welcome to Scheduling! There is a lot to do, we know! This guide is meant to help you wade through the waters of the system, with only the options you need to know. Now that your Agency has decided to make the switch, we know that it can be ...Mobile App Push Notifications
In the event that you stop receiving Mobile App push notifications to your mobile device, do the following steps: Step 1) Ensure you have the most recent Mobile App version installed on your device. Step 2) Check 'My Devices' by clicking the cog icon ...